Keep Power Tools Organized And Ready To Use With This DIY Charging Station
If you enjoy DIY projects, you have probably found quite a few money-saving deals on power tools, and you may have focused on collecting battery-powered units. The design of cordless power tools is convenient, allowing you to work anywhere without worrying about extension cords. The tradeoff, though, is that you have to have places to charge all the batteries you have. If you have several cordless power tools, you probably have several chargers — maybe some from different brands that each require their own hardware – and you need a way to organize them all.
TikTok user MWA Woodworks created a video that shows how to build a shelving unit made specifically to store tools while creating compartments for the battery chargers. The final product keeps everything neat and tidy. Proper battery charging and maintenance is an easy way to extend the life of power tools, and keeping things organized gives you a better chance to have freshly charged batteries when the tools are called into action.
The station built by MWA Woodworks requires 4x8 foot sheets of plywood cut to size, which will then be fastened and assembled with cabinet screws and glue. You'll need a power saw, a pocket hole jig, a power drill, a speed square, a level, and clamps at a minimum for tools, but if you want to match the precision of the TikTok video, you will need some more specialized tools, like a shelf pin jig and a hand pull saw.
How to create the charging station compartment for your power tool organizer
As seen in the full build on YouTube, the MWA Woodworks power tool charging and storage station uses plywood to create an open compartment for the battery chargers. Chargers can have different sizes, so measure the units you use to create the proper height and depth in the compartment. Be sure to include the height of a plugged-in battery when measuring the space you'll need, as the compartment should allow you to charge the batteries in place.
After assembling the compartment, drill a hole in the bottom piece of plywood to allow the power cord for the power outlet strip to pass through and reach the wall outlet. Make sure your power strip's electrical cord is long enough to reach the outlet, based on where you'll hang the organizer on the wall. MWA Woodworks suggested adding a strip of plywood to the compartment as a false wall to hide the cords from the chargers and the power strip, creating a clean look for the final layout. Inserting and removing the batteries is easier when the multiple cords are corralled.
Placing the chargers in a cabinet like this protects them from environmental conditions, such as exposure to direct sunlight, which causes a heat buildup. The compartment should be large enough to allow for ventilation that dissipates heat properly and extends the lifespan of the battery and charger.
Designing the power tool shelf organizer
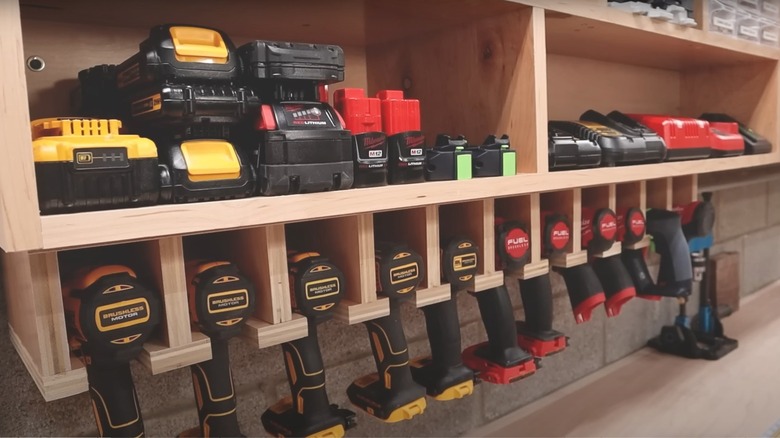
In the MWA Woodworks TikTok video, the cabinet has storage space for nearly 20 power tools, about half a dozen chargers, several batteries, and various boxes of screws, fasteners, and nails. You may not need quite this much storage space for your collection of cordless power tools. If not, you can adjust your design to make it smaller.
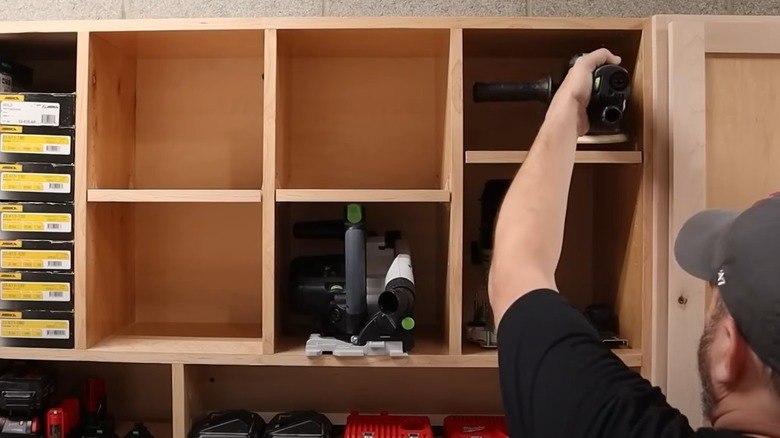
Part of the project involves making compartments that hold the power tools. You can create larger compartments to hold items like saws or sanders. You would just make a large box out of the plywood and then add dividers to fit the size of the specific power tools you own. Use the pocket hole jig to attach the pieces for a clean look. Try adding glue and using clamps to hold everything in place until it dries, and use a level to ensure everything is square.
If you have power drills that you want to add, you can create hanging storage compartments. The handle hangs down, while the compartment holds the wider segment at the top of the drill. Attach small sections of plywood hanging vertically from a larger horizontal section of plywood to accommodate the width of the main section of the power tool. Small horizontal segments of plywood underneath the vertical segment will be added, creating a gap that allows the handle to fit through but that will support the weight of the top part of the drill.