The Stunning Way To Turn An Old T-Shirt Into Upcycled Decor

We may receive a commission on purchases made from links.
There are so many ways to repurpose old clothing in your home and garden, but sometimes you still have more material than you could ever find use for. T-shirts, jeans, and other garments that are too holey to donate can sometimes be recycled into new items, but reusing materials saves us both energy and resources. How about a pretty way to reuse that stack of old Ts, one with real decorative potential? With string, scissors, and a piece of cardboard, you can convert those worn out wearables into a woven mat with tons of practical and pretty uses. T-shirts or other thin knits cut into strips makes for soft, easy-to-use weaving material. Coiling up a T-shirt mat will save your surplus shirts from a future in a landfill while giving you a piece of one-of-a-kind artwork for your home. Placemats, a wall hanging, or a grouping of them stitched into a table runner are just a sampling of how you could put your woven masterpiece to work.
You'll need a large piece of corrugated cardboard to use as a loom backing. Also gather up a tape measure, a marker, masking tape, scissors, a fork (plastic or metal), two or three T-shirts in complementary colors, a needle and thread, and a skein of yarn in a color that either matches or contrasts nicely with the T-shirts. A yarn needle with a very wide eye like these UOOU Yarn Needles can make the weaving task easier, but they're not necessary.
Set up the cardboard loom/weaving structure and make the yarn
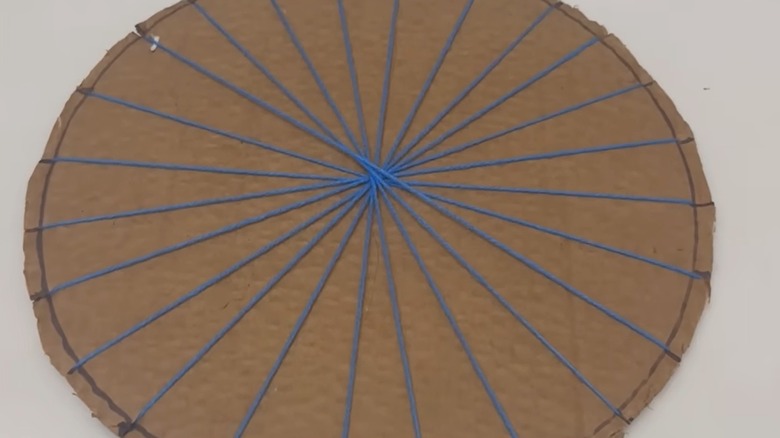
Since this project can be a smart way to repurpose cardboard, grab an old corrugated box to use as the loom. Cut out a cardboard circle with a diameter that's 2 or 3 inches wider than your mat will be. Along the edges of the cardboard circle, make even marks between 1 and 2 inches apart around its circumference; note that a smaller space between each mark will lead to a tighter weave.
Snip ½ inch into the marks so that the circle is edged with tabs. Tuck about 1 inch of the end of the yarn through one of the tabs, and tape the end onto the back of the cardboard. Unroll enough yarn to reach the tab directly opposite to it on the circle so that the yarn bisects the circle. Tuck the yarn into the tab. Loop the yarn around the back of the tab next to it, and reach the yarn to its opposite point across the circle. Continue looping the yarn behind neighboring tabs and crossing them over the front of the circle until there is yarn crisscrossing the circle between every tab.
Make your T-shirt yarn by cutting off the bottom hem and the torso-areas of the shirts. Make 1 inch-wide cuts across the cloth from one side to the other, leaving 1 inch at the opposite seam attached. To snip the resulting series of loops into one continuous strip of fabric, make a diagonal cut across this connecting piece between an end loop and its neighboring loop. Continue making diagonal cuts between the rest of the loops.
Weave and finish your mat
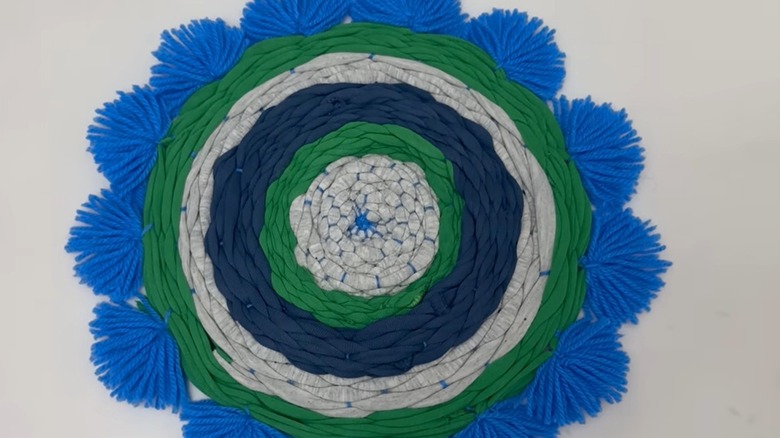
At the center of the cardboard circle, work the end of one fabric strip over and under the pieces of yarn for one full rotation; leave about 1 inch of excess fabric at the center to stitch down later. Use a combing motion with the fork tines against the first rotation of fabric to tighten the weave.
Continue passing the T-shirt yarn over and under the sections of yarn in a coiling pattern. Tighten the weave with the fork as you go. Change colors if and when you want, leaving an extra margin of the fabric strip to stitch in place later. Repeat the weaving and tightening process until your mat is about 1½ inches smaller than the cardboard base. Snip the top of each yarn loop holding the mat to the cardboard, and tie their ends together loosely enough that the mat still lays flat.
Weave the yarn ends into the mat to hide them. Hand-stitch the last ½ inch of the T-shirt yarn to the underside of the mat. Poke the loose end at the center of the mat through the back of the mat and stitch it down, too. Also repeat this process at any points where you changed colors, securing both loose ends. If the knotted yarn makes the edges look too unfinished, a fringe of yarn pom poms or braided yarn attached with fabric glue are cute ways to hide it. Show off your work on a wall or tabletop.