Everything You Can Do With Your Old Wooden Floors After Taking Them Out
So, you're thinking about giving your home a makeover and suddenly you're looking down at your old wooden floors. Maybe they're a bit worn out, or you're just craving a change. It's tough, right? Wood floors aren't just floors; they've got stories, history, and a certain charm that's hard to let go of. Throwing them out feels like a waste, especially when they've been part of your home's character for so long.
Here's a thought: instead of seeing them as scrap, why not give those planks a new purpose? It's a chance to get creative and keep a piece of your home's story alive. Think about it — those old planks can become anything from a funky piece of furniture to some cool wall art or even a part of your garden setup. The sky's the limit. It's about turning a bit of a headache into a fun DIY project. Repurposing your old wooden floors lets you mix a bit of the old with the new in a way that's unique to your space. So, let's get inspired to take on this project. It's an opportunity to flex those DIY muscles, add a personal touch to your home, and do something good for the environment. Who knew that your old wooden floors could be the start of something so cool?
Use as decorative wall paneling art
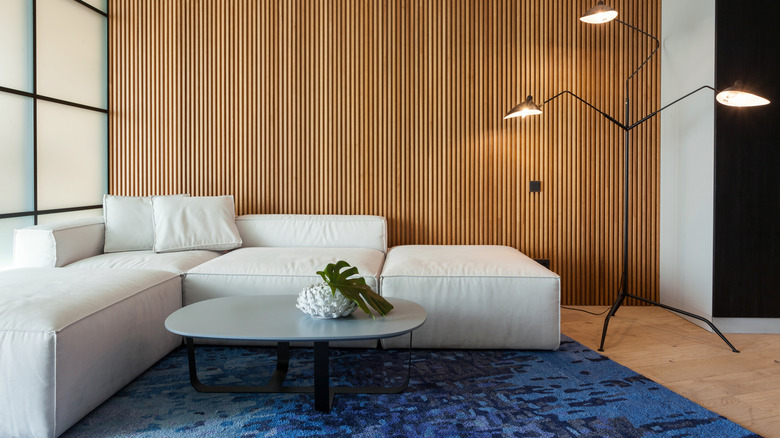
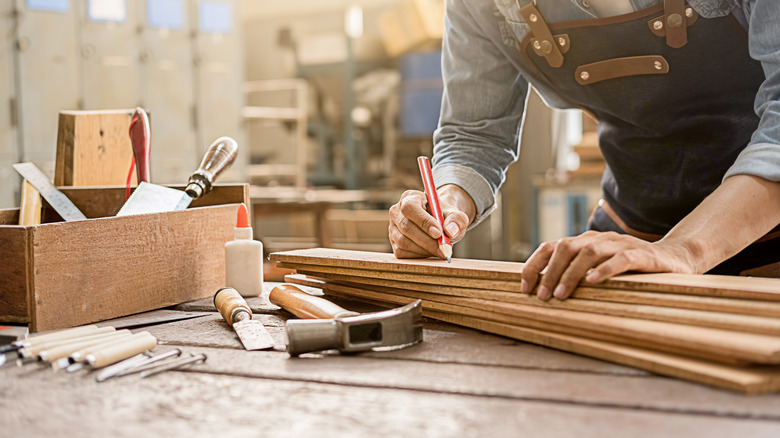
If you want to freshen up your wall, upcycling your old wooden floors into wall paneling is a great wall accent idea. It's like giving your home and those planks a whole new purpose. Ready to dive in? You'll need some basic tools: sandpaper or a sander, a saw, a hammer and nails, a nail gun, and, of course, whatever finish or paint you fancy to make those panels pop. Kick things off by sizing up and slicing your planks. Your design game plan will shape this step. Eyeing a dramatic wall-to-ceiling feature? Go for longer planks. Or maybe you're all about that subtle charm? Then, shorter, varied lengths will craft an intriguing look. Now, let's smooth things over with some sanding. This bit's key to ditching any old finish and preparing the wood for its big transformation.
With your planks all prepped and ready, it's playtime. Lay them out and experiment with patterns on the floor. It's your chance to get creative and see what vibe you're leaning towards. Found your perfect layout? Great. Now secure those planks to your wall. Last touch? Seal or paint your masterpiece. Indeed, this step helps protect your creation, but it's also your moment to tailor the look to your space. And just like that, your old wooden floors have morphed into stunning wall paneling, packing your room with warmth and a hint of history. It's a chic, eco-friendly way to level up your interior game.
Create a charming pathway in your garden or yard
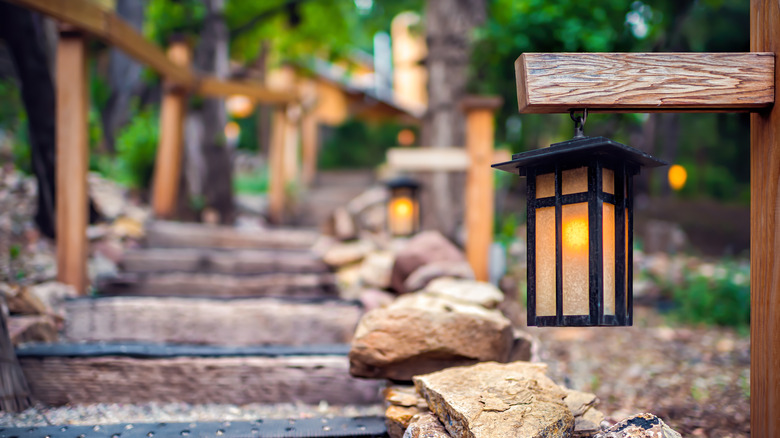
Moving on to the outdoors, why not take those old wooden floors and transform them into a picturesque garden path? It's a great way to bring a piece of your home's interior charm into the natural beauty of your outdoor space. You'll want to gather a few tools to get started: a saw for trimming those planks, a shovel to clear and even out your path, sandpaper to smooth everything out, a measuring tape, and perhaps some wood sealant to shield against the weather.
First off, plan your path. Think about where you and your guests naturally walk or where you'd like to draw attention in your garden. Once you've picked your spot, clear the ground of any debris or obstacles and make sure it's nice and level. Next, measure and cut your wooden planks. After cutting, give those planks a good sanding to avoid splinters and apply a sealant if you're aiming for longevity. For a solid foundation, you might consider laying down a bed of sand or gravel. Arrange the planks side by side to form the pathway, securing them with garden stakes or edging if needed. The finishing touches are filling the gaps between planks with soil, sand, or pebbles. It not only looks great but also keeps everything in place. This wooden pathway project does wonders for your garden, guiding foot traffic, minimizing lawn wear, and adding an eye-catching feature to your outdoor living area.
Design a custom headboard for your bed
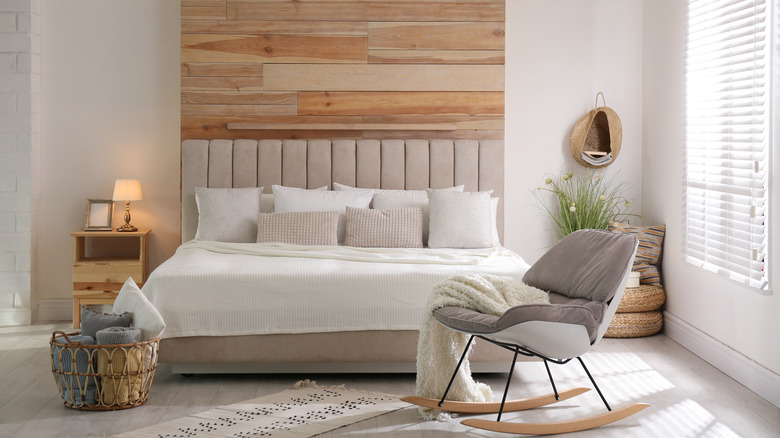
Thinking about how to weave a bit of your home's past into your bedroom design? Why not craft a custom headboard from those old wooden floors? It's a cool way to inject some personality and warmth into your room, making your space truly yours. Here's a rundown of what you'll need: a saw for cutting those planks, sandpaper to make everything smooth, a hammer or nail gun for assembly, wood filler for any gaps, and your choice of stain or paint to finish it off. Don't forget a level and some sturdy mounting hardware, too. Now, let's talk size. You'll want to measure up, considering your bed's width, the mattress height, and just how bold you want this statement piece to be. Once you've got your measurements, kick things off with the back pieces of the headboard. They're the backbone of your project. Trim those planks to size, making sure they're nice and even.
Next up, the front pieces. This is where you get creative with the layout — horizontal, vertical, herringbone — you name it. Adding edge pieces gives your headboard a neat, framed look, rounding off the design nicely. Once assembled, fill any nail holes with wood filler, then give it a good sanding. Pick a stain that vibes with your room's color scheme to really make the headboard pop. After the stain dries, it's time to mount your masterpiece. Whether you go for a French cleat or brackets, make sure it's secure.
Cut the wood into smaller pieces to make unique coasters

Want to add some zest to your dining table setup? Crafting your own DIY coasters from an old wooden plank is a brilliant idea. They're not just practical; they're mini conversation pieces. You'll need a few basics to get started: either a hand saw or circular saw, a hand plane or chisel, some sandpaper, a clamp, and maybe some paint or varnish to finish them off nicely. Start by marking your wooden plank into squares that measure 11x11 cm — a perfect size to fit all sorts of cups and glasses. Once you've got your marks, saw away to create individual squares. This is where your old floor gets a chance to shine again, turning into something both useful and decorative. If the edges of your squares are a bit on the rough side, no stress! Secure each one in a clamp and gently round off the edges with a hand plane or chisel.
Next up, sand down those edges until they're super smooth. If you want to step up their look or give them a bit more protection, slap on a light coat of varnish. It'll make them last longer and bring out the wood's natural charm. Now, here's where you can really have some fun: personalizing each coaster. Use that chisel to etch in some cool designs, names, or whatever textures tickle your fancy. And just like that, you've turned a piece of your old wooden floor into snazzy, one-of-a-kind coasters.
Create wooden picture frames
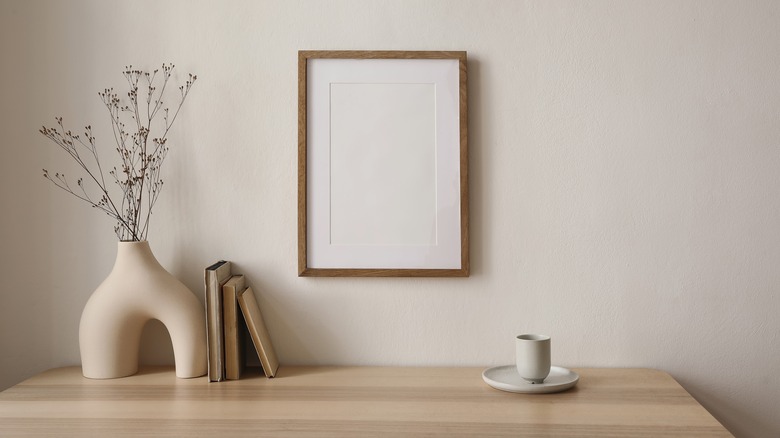
Keeping memories alive and adding a rustic charm to your space is easy when you transform old wooden planks into bespoke picture frames. Let's get right into it. First, you'll need a saw to cut the planks, sandpaper for smoothing, PVA wood glue to stick pieces together, mitre corner clamps for keeping the frame tight while drying, and your choice of paint or varnish to finish it off. Frame stay clamps or similar hardware will also come in handy to keep your artwork in place. Kick things off by sizing up your wooden planks. Aim for a backing board about 300mm x 400mm, which works well for a variety of art sizes. The frame itself will be a tad larger, allowing for a neat border around your piece. Next, assemble the frame. Ensure the sides match up perfectly, then glue them together, cleaning up any excess glue for a tidy look. Clamp the corners to dry, ensuring everything sets up nicely.
After the glue has set, it's sanding time to smooth out any imperfections and prep for the final finish. Now, the fun part: insert your artwork and secure it with clamps. Last but not least, apply your chosen finish. Whether you go for paint or varnish, it's about complementing your room's decor or highlighting the wood's natural beauty. And there you have it — a unique frame that's not just a decor piece but a bridge between your home's history and your current style. It's a simple, meaningful way to elevate your space with memories.
Create raised garden beds or planters for your outdoor space
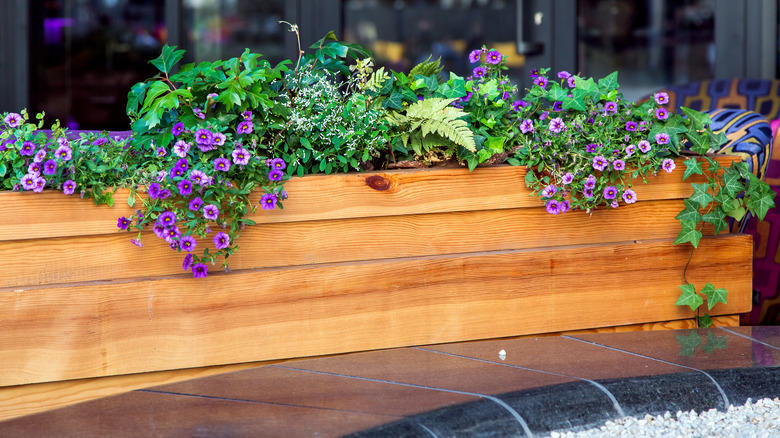
Moving on to the next cool way to upcycle those old wooden floors of yours. How does turning them into raised garden beds sound? Imagine elevating your gardening game while adding a dash of character to your outdoor space. First up, you'll want to scope out a sunny, level spot in your yard. You're going to need a few tools for this project: a saw for cutting the wood (or save yourself a trip and have it cut at the store), a cordless drill, deck screws, and untreated wood planks. Getting the measurements right from the get-go is key to ensure everything fits just right. Be sure to cut two 2x12x8 planks in half to give you four perfect 4-foot lengths to work with. Opting for untreated wood means you're keeping things eco-friendly and safe from any icky chemicals.
Assembly time is pretty straightforward. Position a small 2×4 piece at each end of two boards to serve as the bed's corners. Secure them with deck screws. These little blocks are the backbone of your bed, tucked away on the inside for that neat look. Next, connect the dots (or planks, in this case) at the corners with more screws to form a sturdy square frame. But before you go filling it with soil, lay down a weed tarp at the bottom to keep those unwanted guests out. Now, pour in the soil and get ready for planting season.
Use the planks to craft decorative signs for your home or garden
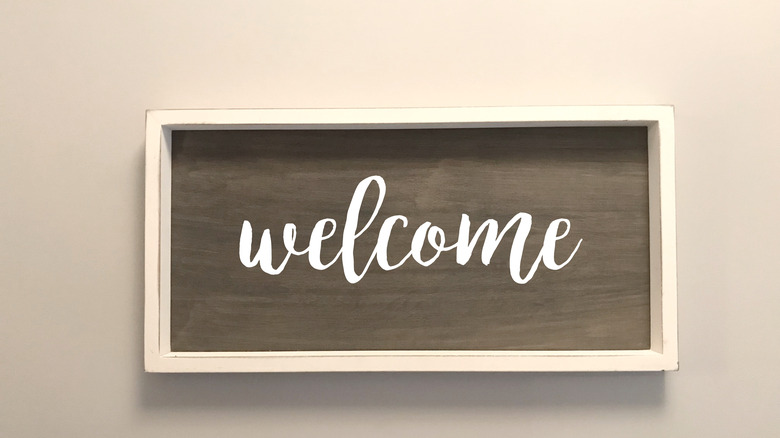
By turning old wooden planks into decorative signs, you get to sprinkle some personality into your space. You can mix a bit of that old-school rustic vibe with whatever style tickles your fancy. You could be welcoming folks with a quirky sign at the door or maybe hanging up your favorite quote where you'll see it every day. To start, you'll need planks about 24 inches wide and a quarter-inch thick. You'll also need some small nails, a hammer, D-ring hangers for easy hanging, and of course, your painting supplies. First, give those planks a good staining. This is where you get to choose how vintage or modern you want your sign to look. After the stain dries, attach each plank to a couple of 1×2s to frame it out and make hanging a breeze.
Now, for your sign's message. Pick a font that vibes with your style, print it out, and if it's larger than one page, just tape the pieces together. Lay down some transfer paper on your plank, put your printed message on top, and trace away. Finally, paint in your letters. Pick a color that'll stand out and really make that sign pop. Made a boo-boo? No sweat, you can erase those transfer marks and try again. Crafting these signs is a fun way to put a personal stamp on your décor.