Faux Painting Techniques That Will Make A Big Difference In Your Home
In modern-day interior design, there are thousands of ways to decorate your home walls, countertops, furniture, and accents. The only limits are typically just your imagination (and your budget), but sometimes your great ideas are also limited by reality. There are times that a material perfectly fits the look you want, but doesn't age well due to household activities and local climates, or perhaps it's just not possible to implement in your current space. Luckily, there is a way around this through faux painting.
Faux painting is a technique that uses paint to create the illusion of another material or surface type. It's often used to mimic eccentric or vintage ideas that don't hold well to the test of time, or that are. Whether you want to recreate heavy brickwork, shining sheet metal, or loud wallpaper, faux painting techniques cover all of these and more. Below are ten methods you might find useful for decorating your home on a budget and with practicality in mind.
Drag a feather through wet paint to create faux marble
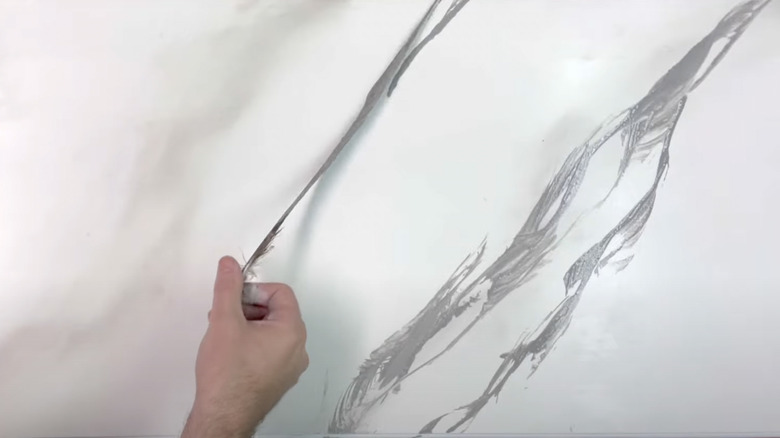
Authentic and swirling marble stonework makes a gorgeous addition to homes, but costs between $40 and $100 per square foot of material alone. Hiring contractors to transport and install it makes prices even higher, putting it out of budget for frugal or budget-conscious decorators. If you're searching for a way to get the marble look without dropping thousands of dollars, you can emulate it using a much more affordable setup: a can of paint and a feather.
Begin by prepping your paint and dousing the feather vanes in the accent paint color of your choice. Lightly drag the feather along your countertop, wall, or canvas where you wish to imitate marble. Lightly shake the feather as you move to get the organic, flowing streaks often seen in marble veining. Marble veins range in many colors — including neutrals, reds, greens, and purples — giving you a lot of freedom when it comes to choosing paint colors. To ensure your creation looks natural, try looking onto a picture or small sample of a real marble slab as a reference as you perform the feather work.
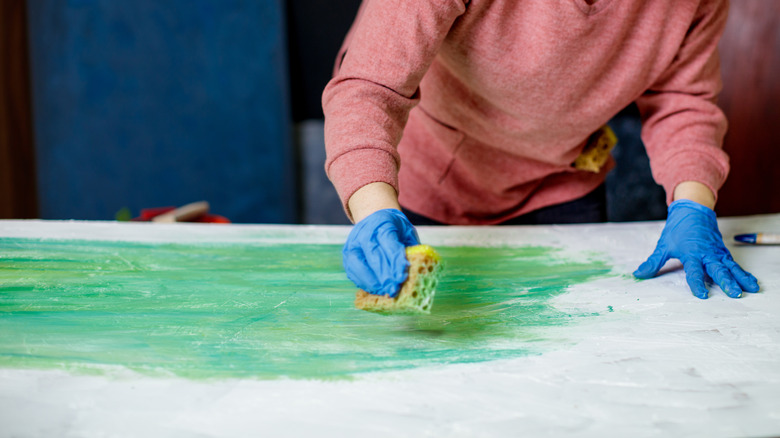
Sponge a surface with glaze and paint to add a multi-dimensional look
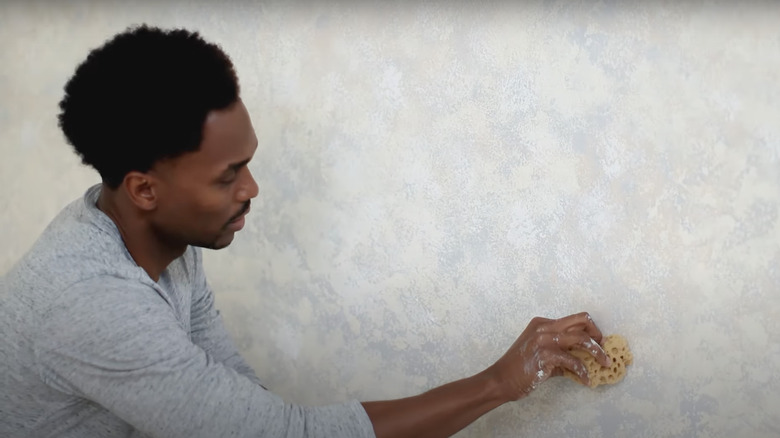
Venetian plaster is a highly sought-after wall technique that adds dimension and texture to drywall. It's a multi-step process to learn and apply, making it a job reserved for experienced and trained contractors. Fortunately, those not professionally trained in Venetian plaster can sponge their wall for a similar effect. It takes fewer supplies, fewer skill sets, and less time, making it more practical than traditional stucco work.
For this, you need a classic sea sponge, glaze, and two or more paint colors. Prep the workspace with a coat of primer and your chosen base color. Then, mix the glaze and your second paint color together and dab them on the wall using the sponge. Make sure to go over the entire wall to get an even look. Be careful not to overdo it, as too much paint will look chunky or too concentrated to actually emulate Venetian plaster.
Dab plastic on glaze to create a ripple effect
Sponges aren't the only method for creating a rippled wall texture. Leftover plastic is usable to the same effect. Creating an art piece through the technique of rubbing a textured surface is also known as "frottage" in the art and architecture industry, and using plastic is considered a slightly more modern method than sponging.
Start by collecting any leftover plastic material, be it plastic wrap, disposable shopping bags, or other similar scrunched materials. Be careful using items with ink or other embellishments, as these can imprint on your painting surface. Go about this process the same way you approach sponging a wall; just dip the plastic material in your chosen paint color and gently press it to the wall in short, quick pats to get the desired multi-dimensional look. Depending on your technique, the wall can have a more weathered, chalky look or a smoother, fabric-like appearance.
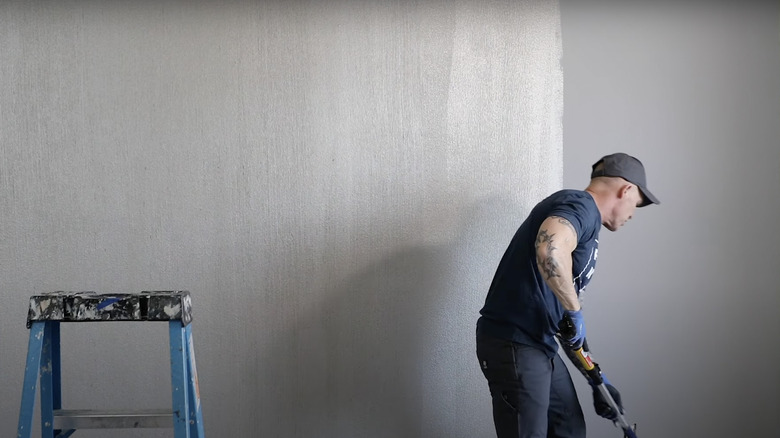
Swipe a dry brush across fresh paint to make hard surfaces resemble fabric
Textile flooring is common, but fabric walls are less-so. Carpeting is tricky to wash, especially when placed in tall, hard-to-reach places that can't be easily vacuumed or spot-cleaned. Most people don't fancy the idea of upkeeping fabric walls, so they pursue the next best thing: faux painting textile-like texture. This technique, also known as "trié painting," requires nearly as few materials as the sponging method.
Faux textile painting takes two paint colors, acrylic glaze, a paint roller, and a dry brush. Make sure the two paint colors contrast so there is a clear difference between them, and choose one to be the base coat. Before applying the second paint color, combine it with a clear acrylic gaze to make it slightly more translucent. Try doing five parts of paint to one part of the glaze to get the right consistency. Roll the second coat over the first with vertical strokes before going over it with the dry brush to get the woven textile look.
Dip a rag in coloring to make a mottled design
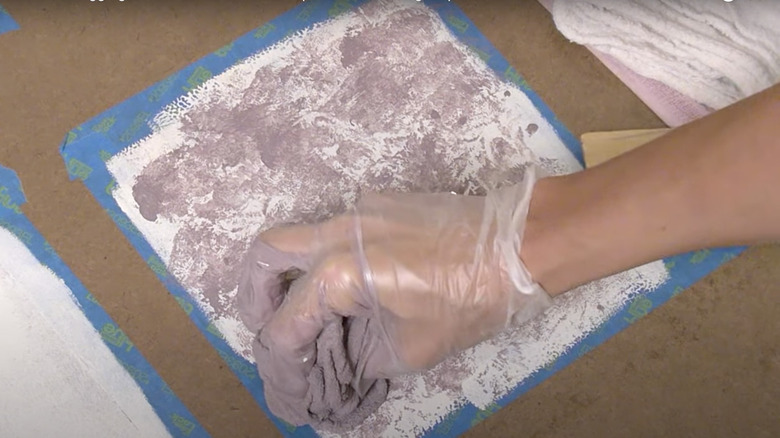
If you want a textile look that looks less woven than strié and more like soft suede or rugged cloth, use a scrunched rag to apply paint to your walls, furniture, or countertops. This method is great for the same reasons as the dry brush tip above — a carpet wall is not always practical, but a wall that looks like carpet is very doable and functional.
All you need are two paint colors at least four shades apart, two sponge rollers, and a clean rag. Don't use a dirty or damp rag, as this can leave dirt, debris, moisture, and other leftover substances on your canvas. Find a friend or family member to help out with this technique, as you need someone to immediately follow the traditional sponge roller with the DIY rag roller. As person one applies the paint with a sponge roller, the second should follow after with the roller wrapped in a crumpled-up rag, aptly giving the paint your desired texture.
If you don't want to make your own rag roller, you can buy one from The Woolie for under $25. You can also do this technique by hand with just a bunched rag (meaning, without a roller), but it may be too tiresome and time consuming for a large space like a wall.
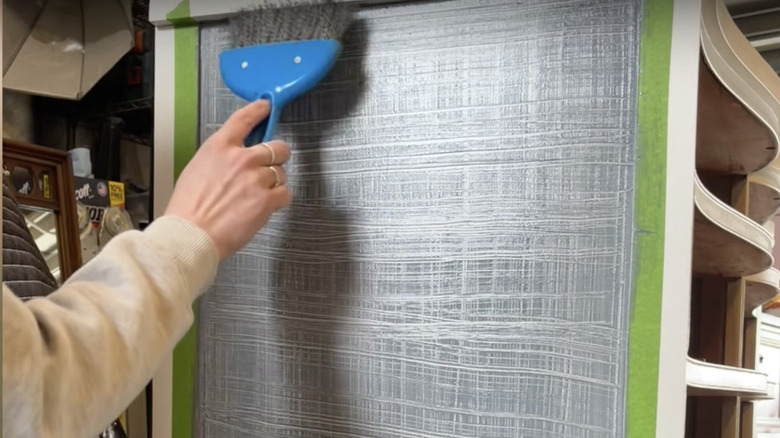
Use liquid zinc to make surfaces appear metallic
Liquid zinc is applicable to countertops, walls, and other surfaces to give home accents a metallic look, without using actual solid metal. Metal isn't always the best idea for homes as it's expensive, heavy, and reverberates sounds, making it extremely noisy when used in excess. Instead of dealing with the repercussions of metal surfaces, faux painting with liquid zinc creates the same aesthetic impact with none of the downsides.
All you need is liquid metal powder, water, and a brush or roller. The powder isn't a common find, and you may need to order online from somewhere like Pontiac Paint Supply. You'll need to check the item specifications, as all formulas are slightly different. For example, Paramount Coatings' zinc base and zinc powder must be mixed and applied within four to six hours. Leave it to dry for at least a day before applying the aging solution with a brush. The aging effect starts setting in after a few hours and can take up to a week to finish.
Innovate with a crackle formula to fabricate an aged antique aesthetic
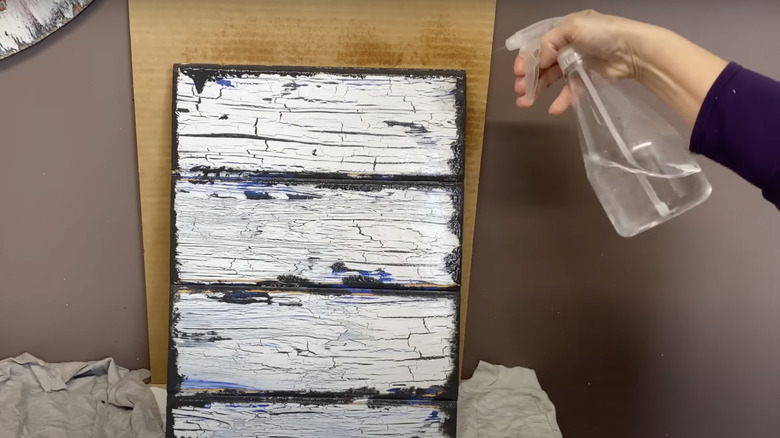
Liquid zinc painting isn't the only mock material formula out there. Crackle paint is another product you can use to make household surfaces and walls a little more interesting. It creates an aged, weathered look without depreciating surface quality or strength. It works by adding cracks and character to painted surfaces, making them eye-catching and fit for rustic, traditional, and bohemian interior designs. There are several crackle "mediums" to choose from, including thin and thick options that make the effect subtle or dramatic, depending on your preference.
This method works over many types of paint, including milk, chalk, acrylic, semi-gloss, and flat latex — meaning you can use it on metal, stone, and other surfaces. Once you've finished priming and painting a location, you only need to apply the crackle paint over it with a roller. The crackle dries faster than the paint job beneath it, and when the bottom layer finally does dry, it shrinks and cracks due to the topcoat.
Craft homemade stamps and stencils to DIY patterned surfaces
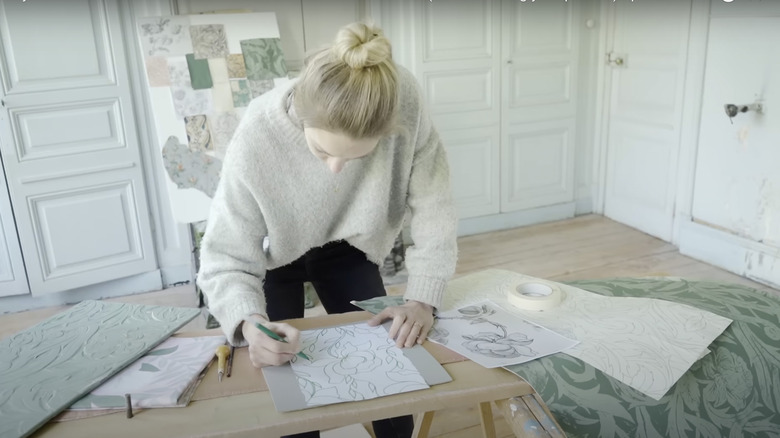
With maximalist decor on the rise, colorful wallpapers are also coming back in style. These rolls of stylistic paper turn your walls into artwork, adding depth through playful patterns. However, wallpaper has its downsides, as it can be expensive, has limited options, and is difficult (and sometimes impossible) to clean. One way around all of these cons is to turn to faux-painted wallpaper instead.
If you craft your own stamps and stencils, you can create any design or pattern you can imagine. To get started, you can follow Lowe's video tutorial for making stencils. If you don't have the artistic skill or the time to create your own, you can also purchase these products from Etsy sellers, Oak Lane Studio, Cutting Edge Stencils, or other online shops.
Applying stencils and stamps to your wall takes several steps. With a stencil, you should first spray one side with repositionable adhesive spray, tape it to the wall with painter's tape, draw over the stencil with a paint roller, and repeat. You can find more specific instructions in Oak Lane Studio's helpful tutorial. When using a stamp, dip the tessellated side in paint and carefully press it into your wall to leave the design behind. You should do a few practice stamps to get a feel for it and see how your design will turn out before using it on the intended surface.
Paint over red and orange metals to emulate verdigris
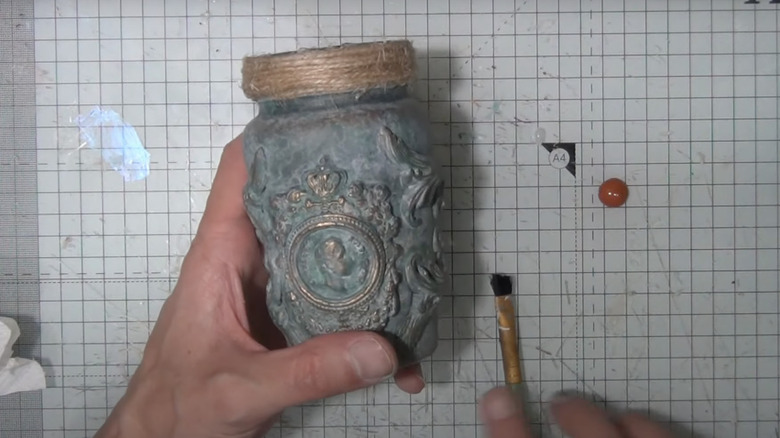
There is something appealing about a fake antique finish since it has all the charm without actually degrading the quality of a surface. Verdigris is the light teal patina effect that takes over orange metals as they age over time. This process begins as soon as an object is exposed to oxygen, carbon dioxide, and moisture, but takes months or years to reach mottled shades that serve a fashionably vintage look. Instead of installing impractical metal and waiting for it to change color on its own, you can replicate the patina look using a little bit of paint.
Start with liquid-based metallic paint to emulate the antique look you want, such as the Americana Decor Metallics paint collection from Michaels. Add a patina-hued paste wax, like this one from Artsy Chicks Rule, or use a teal, green, or light blue paint if you're more comfortable sticking solely to paint throughout the process. Go over the metallic coat with the wax or paint using a brush. Once finished, press a dry rag or paper towel on the high points of the raised surfaces. If you're drawing over a flat canvas, such as a countertop or wall, use an image of natural patina-affected surfaces to reference where you should be dabbing and creating the faded effect.
The final step is to put white paint on a bristled brush — the more worn out and frayed the brush, the better. Carefully apply the white to spots where the reddish metal tones shine through. Once finished, your final product should look like the bronze or copper-colored paint is naturally transitioning to verdigris.
Apply tape and paint strategically to fashion a faux brick wall
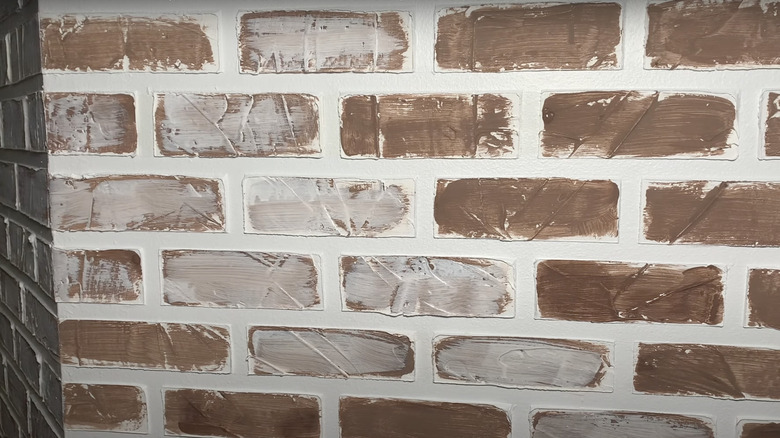
Brick walls characterize industrial and farmhouse-style interiors. Brickwork has warmth and character that greatly accentuates interior decor, but its porous composition isn't the most practical choice for modern homes. The mortar between bricks is highly absorbent, soaking in moisture that makes it vulnerable to cracks and mold growth. Instead of putting your health and safety at risk for your aesthetic, opt to faux paint the brickwork.
Begin by painting the entire wall in a natural grout color: any shade of white, grey, brown, or black. Use a level and pencil to mark your walls in a gridded brickwork design. Apply painter's tape atop the penciled lines to protect the base color that will emulate the grout. Since the painter's tape protects the faux grout, you can now paint over the rest of the wall in your chosen brick color. Once you finish painting, you can either wait for it to dry or immediately remove the tape — it's up to you, as whichever route you take will have little impact on the finished product.