12 Affordable Renovation Hacks To Fake A High-End, Luxurious Home On A Budget
A high-end home doesn't have to come with a luxury price tag. There are ways to mimic sophisticated homes, within a smaller budget. We've rounded up some affordable project ideas that can make your home look more upscale. Ranging from minor updates to larger projects, these renovation hacks can help you emulate the high-end home of your dreams in your humble abode.
To help save on costs, most of the projects ahead are DIY-friendly. We chose projects with fairly simple renovation processes. Many can be accomplished with hand tools (though basic electric tools can be convenient), and for the bigger tasks, a DIY partner is helpful. The cost range for these projects span from under $100 for basic materials, to a couple thousand dollars for larger, transformative renovation projects. On an extra tight budget? There are some small changes that'll make your home feel more luxurious without renovating. If you're looking for a bigger update, keep reading for some low cost renovation ideas that feel expensive.
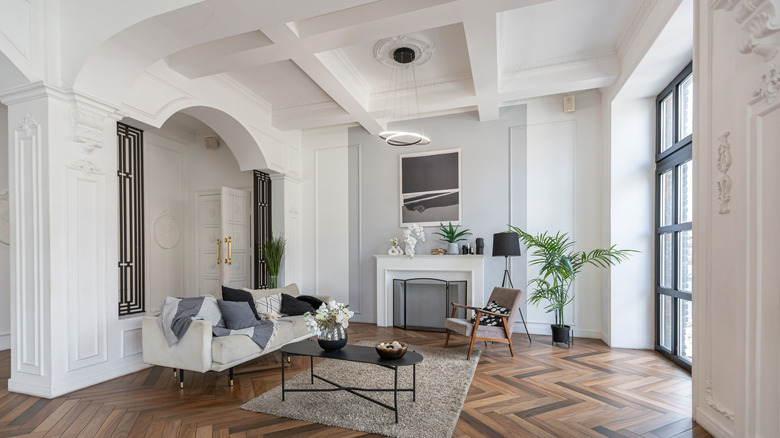
Install trim around walls and doorways
Finishing details are very important in high-end homes. The right features can make your home look more expensive than it is, and one example is wall trim. Plain walls, even if they're intentional, can look a bit too ordinary. Your walls might benefit from some decorative trim to give them a facelift. This can include crown molding, baseboards, and trim around doors or archways. Molding can come in elegant and traditional designs, some with ornate styles that bring a sense of old-school luxury. Unadorned, contemporary options are also available for modern rooms. But either way, trim has timeless appeal and will make your space look more polished, rather than basic.
Installing wall trim can be taken on as a DIY project, and we've covered how to properly install crown molding, how to replace trim and baseboards, and more. There's a wealth of online resources to walk you through installing your trim of choice, saving you a lot on professional installation costs. On average, wall trim costs from $0.50 to $10 a foot, but you can definitely find more expensive trim if it's a premium material or particularly ornate. For installation, a nail gun and miter saw is best, but you may be able to get away with hand tools (a hand saw, miter box, hammer, and nails) for a small job. With all these factors in mind, the price of installing wall trim will end up costing a few hundred dollars. Expect to spend on the low end ($100 to $200) for small rooms (or even medium rooms if you choose cheap trim and already have the tools), to over $500 for larger rooms, and if you need to buy new tools.
DIY floor-to-ceiling built-ins
Well-decorated floor-to-ceiling built-ins are a feature that's associated with luxury. It's no surprise then, to find out that professional installation can be expensive. Built-in shelves and cabinets are usually custom fitted and can cost thousands of dollars to install. It's the perfectly-fitted look that makes them look high-end, because of the extra effort that goes into making them seamless. You can install your own version, using affordable store-bought units, and then add trim to give them a custom, built-in look.
This video from @loveletters_home shows their project process, where they use IKEA HAVSTA cabinets and BILLY bookcases as the base for floor-to-ceiling built-ins. This project is doable for most confident DIYers, and you'll save hours of professional installation costs. To create the exact same layout as in the video, they used five HAVSTA cabinets ($320 each) and four large BILLY bookcases ($69 each), trimmed down to size. In total, these will cost $1,876. Adding some trim and paint will likely cost up to a couple hundred dollars more. These materials make a very large unit, measuring almost 160 inches across, so costs will reduce significantly for smaller rooms. For example, if you just need two of each piece, it will cost you $778 for the base units, which will still make a gorgeous built-in for a small den or office.
Paint with rich and sumptuous tones
Paint color can make a striking difference on the ambiance in a room. Paint colors in a high-end home can span across the color wheel, but they share a few traits: They have a rich and layered tone and create a sense of calm or elegance. Color examples can include soft and warm neutrals (like warm whites, beiges, and grays), earthy tones (like rich browns, terracotta, and greens), and moody jewel tones (like lush dark blues and purples). For more guidance, here are luxe color schemes that'll make your home look more high-end and the best neutral alternatives to white paint for a timeless room.
Painting a room is a big task, but a worthwhile one for homeowners on a budget. As expected, it's cheaper to do it yourself, sometimes significantly. On average, professional painters charge between $2 to $6 per square foot to paint. Depending on the room size, a job might cost anywhere from a couple hundred to a couple thousand. On the other hand, a gallon of paint costs $20 to $70 on average, and that will cover upwards of 350 square feet. Even with the cost of materials (you can get most in a set, like the Bates Choice Paint Tray Set, for under $20), you can spend cents per square foot, potentially even less than $100 for a room, by doing the job yourself. Here's more information on how much money you can expect to spend painting a home's interior.
Take advantage of peel-and-stick wallpaper or backsplashes
There's good reason why peel-and-stick products are so popular. They are very DIY-friendly, renter-friendly, and much more affordable than their traditional alternatives. Due to its popularity, there are many designs available, including lots that mimic popular high-end features. You can get the look of luxurious wood, stone, or colorful patterned tiles on your wall, in the form of an easy-to-install sheet. Peel-and-stick wallpapers with intricate old-fashioned prints and detailed textures can help you achieve an old-money look, while sticking to a budget.
Peel and stick products are designed for the average consumer to install, so you don't have to budget for any pros. Many products also don't require any tools for installation, and already have adhesive built-in, so the renovation cost is really just in the product itself. Professional wallpaper installation can start at $1 per square foot and can go up much higher — then you have to add the price of the wallpaper and supplies. As a point of comparison, the Mr. Kate Stella Grasscloth Wallpaper shown in the above video costs around $2 per square foot and already comes ready to install. A luxury grasscloth wallpaper like the Serena & Lily Grasscloth Wallcovering costs about $5.50 per square foot. That's just for the wallpaper itself, with no installation costs. Accounting for installation, this luxury wallpaper can cost triple the amount to install compared to the similar peel-and-stick alternative.
Add elegant wall molding
Wall molding can add old world charm to a room, bringing a sense of traditional luxury and elegance that really elevates a space. There are tons of options — popular types include picture frame molding, wainscoting, beadboard, board and batten, chair rails, and the highly-prevalent crown molding and baseboards mentioned above. Moldings installed to the middle of the wall are eye-catching and become more of a feature than peripheral trim. If you want a wall accent that draws the eye, but doesn't take over the room, paneling is an excellent option. It's detailed, but looks more understated and classy than accent walls or busy wallpaper.
Hiring someone to install traditional wall paneling, especially those made of solid wood, can get expensive quickly. An average cost is around $3,600 for a 12 by 12 foot room, but costs can vary greatly from $1,000 to tens of thousands, depending on the molding, paneling, or wood type. There are lots of DIY ways to get the look for much cheaper, with several options costing under $1,000 for a medium-sized room. Costs get even lower if you choose to do onlly an accent wall, like in this example from @lonefoxhome. They create the look of a board and batten wall with simple hardware store materials, like the Reliabilt 1-in x 4-in Primed Pine Board, which costs $20 per 16-foot piece. Adding in the cost of paint, likely the other biggest material cost, it's possible to do this type of project for under $200 for a smaller room.
This is just one project idea of many, though. The easiest and most affordable way to complete this type of project is following the example of @thesaavyseeker. They use peel-and-stick wall molding to achieve the look. A product like the NeatiEase Peel and Stick Wall Molding Kit costs just $50 and can cover a small wall — no other materials needed.
Make room for an appliance garage
A appliance garage is far from a necessity, and that's exactly what makes it feel luxurious. It's an aesthetic renovation, perfect for those who want completely uncluttered counters. Built-in appliances scream luxury, but updating your large appliances is expensive. It's a lot more affordable to make an appliance garage, which helps you get some of that built-in vibe, without the high price tag.
There are many ways to implement an appliance garage in your kitchen for less mess. Typical of more affordable renovations, this is one that you can DIY. This video from Angela Marie Made on YouTube shows the full build for this appliance garage, the frame was part of a larger reno, but to turn the nook into an appliance garage cost them around $250. An even easier and cheaper way to get an appliance garage is following the lead of this video from @followfearfindbeauty and simply placing a cabinet on top of your kitchen counters. There are also IKEA cabinets that can be repurposed into an appliance garage. For a similar look to this video, you can opt for the SKRUVBY cabinet with glass doors for only $99. For a more upscale design, the TITTEBO Roll-front cabinet has a distinctive front door and costs $199 — not bad for a luxurious-feeling kitchen upgrade!
Update fixtures and hardware, and make sure they match
It's no secret that updating your fixtures is one of the best quick and budget-friendly ways to transform the look of your space, especially in kitchens and bathrooms where there's lots of pulls and knobs. Changing old hardware out for more high-end options will instantly give the space a bit of a boost. It's not only about drawer pulls and cabinet knobs either — you could also switch out faucets, switch plates, hooks, and towel rods. Styles vary widely and depend on what kind of look you're going for. For example, for more traditional rooms, old fashioned ornate hardware can look very elegant. For modern rooms, something sleek and simple suits the aesthetic. Overall, cohesiveness is important to get a high-end look, so make sure to match colors and styles within a room.
A product like the Rejuvenation Lyle Cabinet Collection is on the pricey side, with the smallest single knobs costing around $25. That being said, it's cheaper than a larger kitchen renovation, especially since you can swap all the pieces out yourself. It's also possible to find much more affordable packs of cabinet hardware, like the Ravinte 10-Pack 3-Inch Drawer Pulls, which cost just under $25. Costs can climb if you're replacing pricier fixtures like faucets. However, this project still usually ends up within the "affordable" range.
Add lighting under cabinets and furniture
There's something elegant about down lighting, especially under kitchen cabinets and big furniture pieces. Adding lighting sounds like a big renovation project — and it is if you need to update wiring. But with a variety of battery-powered options on the market, you can get a similar luxurious effect, but on a tight budget. This type of lighting looks custom and adds layered lighting to your space that feels upscale. Popular locations for this project include under upper and lower kitchen cabinets, your couch, your bed frame, and your TV unit.
It's possible to accomplish this project for under $100 quite easily. For under-cabinet lighting, you can use the MCGOR Under Cabinet Lighting, which costs $30 for a two-pack. Then, you'll just need to add the cost of adhesive trips or magnets to however many lights you need. This video from @rowenhomes shows how simple it is to install LED light strips onto furniture, so you can get that down-lit look in other living spaces. The Govee RGBIC LED Strip Lights cost $15 for about 16 feet of lighting with built-in adhesive, so if you're just outlining a small couch or headboard, it's possible to take on this project for under $20.
Remove or cover popcorn ceilings
Popcorn ceilings were so ubiquitous in the mid-to-late 20th century that they're heavily associated with dated interiors. Many homeowners quite simply just find them ugly. They look outdated and messy — far from the sleek and smooth look of modern day ceiling styles. Popcorn ceilings don't mix well with traditional details either, as the ceiling looks too busy and distracts from nice old-fashioned touches, like ornate crown molding or ceiling medallions. In short, this is a project that can really update the look of your interior.
Getting a pro in to do the job can cost an average of $750 to $5,000 (for about 750 to 1000 square feet of ceiling area). Doing it yourself will cost closer to $100 to $500 in materials (don't forget a necessary asbestos test) and quite a lot of elbow grease. You also might have to pay for a junk removal service if you're doing a large area. The aesthetic gains are significant though! If you don't want to go through the mess of removing the texture, there are some ways to cover dated popcorn ceilings instead.
Update interior doors
Doors are more than just the gateway from room to room. They take up a lot of wall space, so they can make a big visual impact. There are a few options to update interior doors and make them more high-end. An affordable and DIY-friendly option is to paint them. Contrasting paint has a high-end look. If it's in the budget and you want an even bigger upgrade, consider installing new doors. Again, cohesiveness contributes to the luxury look, so match all the doors in a room or even the whole home.
Painting doors is affordable. A gallon of paint costs $25 on average, which covers up to 400 square feet. Standard interior doors vary in size, but are usually around 21 square feet. With painting supplies, it's possible to accomplish this project for under $100. Replacing doors is a bigger and more expensive job, but higher-quality doors go beyond looking nicer — they feel more deluxe and can help with soundproofing too. Pre-hung doors are easiest for DIY installation. Solid core and solid wood will look and feel more luxe. An example of such is the EightDoors 36-in x 80-in Solid Core Door, which costs $220 per door. That's a pretty penny, especially if you're replacing a few doors, but if you install them yourself, you can save between $100 and $400 per door, possibly cutting the renovation cost in half by DIYing it.
Update light fixtures
New light fixtures can make all the difference in a room, and there are lots of products with a high-end look and an affordable price tag. Lighting contributes to the visuals and ambiance of your space. If you have a drab light source, it can bring the whole room down, even if it's nicely decorated. Lights are another form of decoration for your ceiling and walls, so choose options that look elegant and high-end to elevate a room's look.
Installing new lights sounds expensive but it doesn't have to be. It's probably easier than you think to replace an existing light fixture and it's possible to find striking products for under $50. One of the lights shown in this video from @lauraleeandjake is the MEIXISUE Gold Modern Sputnik Chandelier Ceiling Light, with a wallet-friendly price tag of $40. Prices vary, of course, and if you want to go for something more luxurious, there are high-end lights that cost hundreds of dollars. It's also possible to add affordable lighting with battery-powered bulbs. As this video from @creating.a.casa shows, you can place one of these bulbs in your feature of choice to bring the light, without any hard wiring required. The Brightown E26 Rechargeable Light Bulb costs $26 for two bulbs, a tiny cost compared to adding more wiring to your home.
Install smart home accessories
Adding smart thermostats, lighting, locks, automated blinds, or security systems gives your home a futuristic feel, and it's not crazy expensive either. It turns out, with so many smart products on the market, they're more accessible to the average Joe than ever. There are plenty of products that are easy to install and come at a reasonable price.
You can make your home smart for under $20. More accurately, for $12.99, the cost of a smart bulb, like the Amazon Basics Smart A19 LED Light Bulb. Smart bulbs are dimmable and often color-changing — plus you can control them from your phone or a smart speaker, which adds to a luxurious ambiance. That's just the tip of the iceberg though. This video from @tylerlcrawford shows the SwitchBot Smart Switch Pusher, a smart switch clicker that costs $30 and the RYSE SmartCurtain, an automated blind controller which costs $150. Costs can climb to a few hundred dollars for gadgets like smart security systems. So, with options ranging from around $10 to a few hundred, smart home accessories are a surprisingly affordable way to make your home feel more high-end (and more convenient too).