7 Beautiful Ways To Modernize Dated Wood Paneling On A Budget
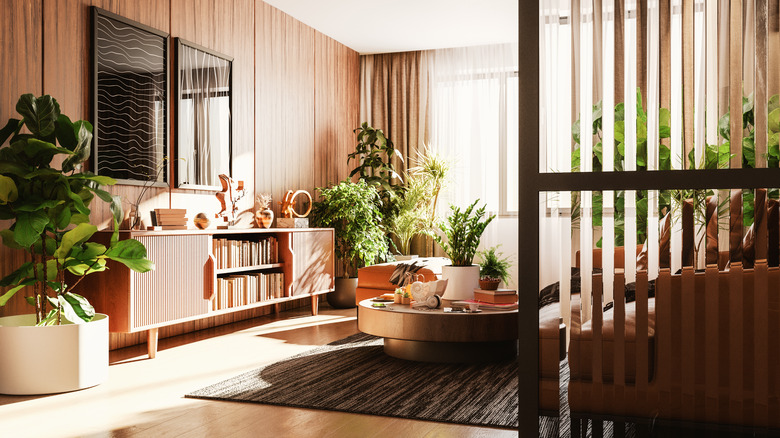
Wood paneling is a huge interior decor trend right now that can be utilized to give bedrooms a luxurious hotel atmosphere, or living rooms a formal yet cozy appeal. However, not all paneling is created equal, and if you've got some old-fashioned paneling in your home it might not be giving off the stylish vibes you were hoping for. Paneling can look dated if it has an orange hue that was popular in the 1970s, or if it has a high-gloss varnish from years of re-applying finish. Sometimes paneling can appear unattractive if it's been painted in a color that went out of style years ago, or if it simply hasn't been looked after.
Removing wooden paneling carries some risks because you never know what you might find once you start pulling fixtures down from the walls. The drywall beneath might need to be repaired, and even if the walls are in good condition it's likely they'll need some TLC before you can get on with painting and updating them. An easier and less expensive way to modernize the room is to work with the paneling instead of removing it. There are plenty of budget-friendly ways to make paneled walls and paneled ceilings work in your space.
Whitewash old paneling for a coastal vibe
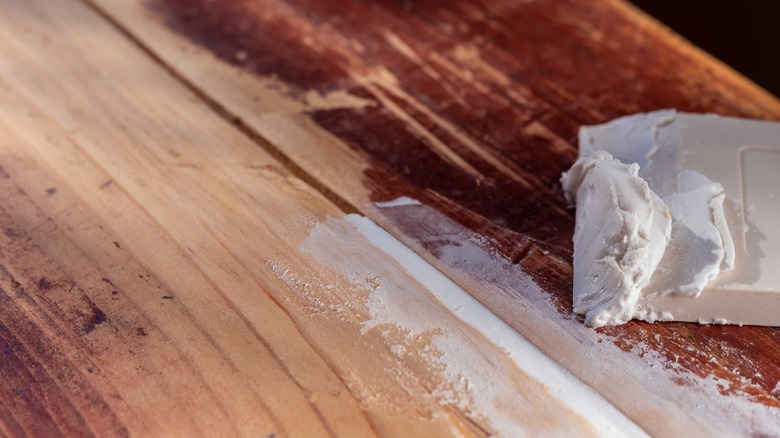
Whitewashing dated paneling can instantly transform a dull room into a bright and airy space that goes hand-in-hand with coastal vibes. The best color palette for a coastal home decor style includes white, beige, and blue, so whitewashed paneling works perfectly for this theme. Faded wooden finishes are also popular in beach-style interior design, so combining wooden paneling with a translucent white finish where the grain of the material can still be appreciated makes sense if you want to achieve this look. Whitewashing presents an excellent option for anyone who wants to save a few bucks because it involves diluting paint with water, usually at 1:3 ratio, but you can use less water for a more vibrant look. By diluting the paint, your materials will go a lot further, reducing costs compared with painting the paneling in a solid color.
To whitewash old paneling you'll first need to remove any existing paint, stain, or varnish by sanding the wood back to its original state. This is important because you'll want the grain and knots of the wood to be visible through the whitewash. Next, select a flat white interior paint such as the 'Ultra Spec 500 Flat' by Benjamin Moore. Decant this into a large bucket, and add an equal measurement of water. Stir the paint and water until fully mixed, then apply to the bare wood with a paintbrush. Paint one plank of wood at a time, then immediately wipe it off with an old rag. This gives a soft finish, removes any brush strokes, and ensures translucency.
Refinish with wood stain for an updated look
If you're looking at your existing wood paneling and wondering why it looks so old-fashioned, the answer is most likely the color. Wood paneling from yesteryear often wears a dreaded orange-tinted brown stain, which looks stuffy and tired to the modern eye. You can easily update dark and dated paneling by stripping it back to its natural color and refinishing it with a contemporary paint stain. You can choose a shade that matches your decor style, for example, Varathane 'Premium Fast Dry Wood Stain' in 'Carbon Gray' will work well for a sleek and cool home, while 'Rustic Sage' would be a gorgeous choice for an earthy-inspired space.
To get the best results when updating your old wood paneling with a stain, you'll need to remove any existing paint, stain, or varnish. This can be achieved using an orbital sander, working in the direction of the wood grain for a smooth and flawless finish. Vacuum up the dust to ensure the paneling is clean before you move on to staining it. If you're using a polyurethane stain you should follow the manufacturer's directions, applying in even layers with a paintbrush. If you would prefer to enhance the natural beauty of the wood, you can use an oil such as Danish oil from Rust-Oleum, which can be wiped onto the wood with a microfiber cloth.
Update old-fashioned wood paneling with paint
One of the most popular ways to update old-fashioned wood paneling is by painting it. This makeover strategy is so easy that anyone with access to some sandpaper and a paintbrush can do it. In the space of a weekend, you can completely overhaul the look of a room, making it more in keeping with your decor style. Paint the paneling the same color as the rest of your walls for a seamless appearance, or opt for a bold color to make a statement in your space.
The best way to paint wood paneling involves doing some prep work before you get anywhere near a paintbrush. The paneling will need to be sanded, cleaned, and primed, and then you can get started on the fun part. Remember not to skip priming as it will prepare your surface. A primer specifically designed for use on interior wood, like this one from Sherwin Williams, will help to smooth out the surface and give your paint the best possible finish. If there are any holes or dents in the paneling you'll also want to fill and sand these prior to priming and painting. Use an interior paint designed for wood, and apply with a paintbrush to ensure you get in between each plank of wood.
Fill and sand paneling for the illusion of drywall
Regardless of whether or not wood paneling is coming back in style, this wall covering just isn't for everyone. If you want to disguise your wood paneling rather than update it with a modern vibe, there is a DIY hack to make paneling look just like drywall. If a flat, regular wall is what you're after, this will be a much cheaper alternative than ripping out the paneling and patching up the walls behind. It will also cause considerably less mess, and have a much quicker turnaround time. Win-win!
To create the illusion of drywall with your existing paneling, start by priming the wood. This will help the spackle compound to adhere in the next step. Once the primer has dried, you can fill the gaps in between each plank of paneling with spackle compound or drywall mud. Once set, use fine grit sandpaper to smooth down the areas that have been filled, and apply primer over the top. Next, paint your paneling in any color you wish, applying the paint with a paintbrush at the corners and a roller on larger areas. A minimum of two coats will be required for a professional finish. Next, sit back and enjoy the look of a smooth, seam-free wall that looks just like regular drywall at a pinch of the cost.
Distract from dated paneling with wall art
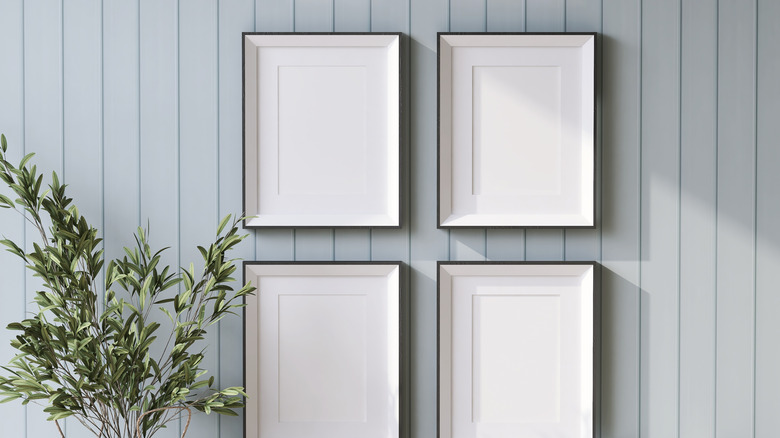
Sometimes drawing attention to other parts of the wall is all you need to do to make your wood paneling appear more stylish. Hanging wall art, photo frames, or a canvas print on paneling can create a focal point and distract from any parts of the walls you might not be too fond of. The larger your wall art, the more of the paneling you can cover, so don't be afraid to go big and make a statement. When thinking about colors, try to avoid any shades that will contrast against the paneling as this will make it stand out. For example, if your wood paneling has an orange tone, avoid green in your artwork because this is a contrasting color. Instead, decorate your home using the color wheel by selecting art work in analogous colors. These are shades that are close to your existing color on the color wheel.
When selecting art to hang on your paneling you'll need to consider practicalities as well as visual appeal. Most wooden paneling is quite thin at around a quarter inch thick, so it can't hold a lot of weight. However, by finding a stud beneath the paneling, you can hang whatever you like on the wall, including heavy items such as mirrors. Locate the studs by finding nails in the paneling. These should have been inserted into spots where studs exist, so you can add new nails for hanging your art just above or just below the current nails.
Enhance the stripes in wood paneling
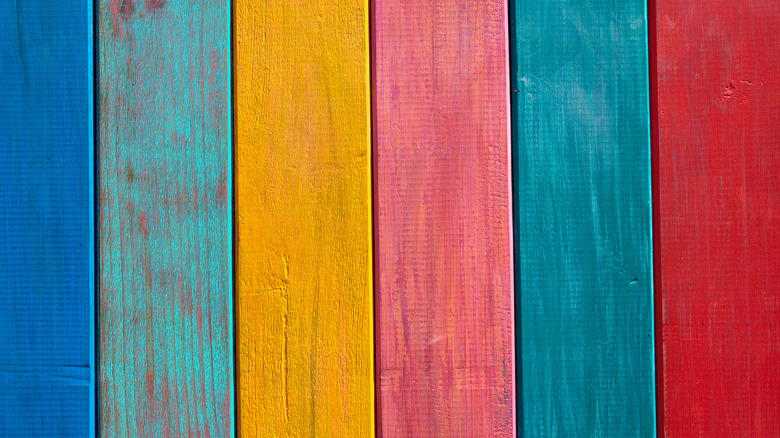
Wooden wall paneling typically has a vertical grain, which is more pronounced depending on the type of wood used. Instead of fighting against this feature, embrace it and give it a modern twist with some color variation. You can enhance the stripes in wall paneling for a quirky appeal by painting the paneling in one color and using a contrasting color for the seams, for example, black paneling with white seams. Alternatively, opt for a look that is more subtle, by painting the paneling in light green and filling in the seams with a dark green paint. You could also look at each plank of wood as a stripe, and paint each individual piece in a different color.
Creating stripes on wood paneling is a great way to use up any old paint. If you have a wide variety of colors left over from other projects, use the paint to make each plank of wood a different color. Alternatively, use some leftover paint and a thin paintbrush to paint the seams in between the panels for a more ornate look. These options are ideal if you want to make over your walls without spending a fortune, and the result will be completely unique to your home. Remember to always sand and clean the panels before you paint them for a smooth finish.
Transform wood paneling with stylish wallpaper
One lesser-known way to modernize old-fashioned paneling is with wallpaper. This will completely cover the paneling as if it was never even there, and it's much cheaper and easier than removing the paneling to wallpaper the drywall beneath it. You can wallpaper directly on top of wood paneling using regular wallpaper and paste, as long as you have suitably prepared the paneling.
To prepare your paneling you'll need to remove any trim that protrudes from the wall, ensuring you're working with a flat surface. Pull out any nails are screws that are jutting out, and fill deep gaps between panels as well as holes or cracks with putty. Next, apply a layer of primer using a paint roller. This will help to create a surface that the wallpaper can adhere to. There are specific primers intended to be used underneath wallpaper, such as this one from Roman, that are ideal for this purpose. Once the primer has dried, you can hang the wallpaper as usual, using wallpaper paste, scissors, and a smoothing tool. If your paneling has deep seams or it is in poor condition with numerous dips or scratches, opt for a thick, textured paintable wallpaper, which is perfect for covering imperfect walls.